Riders spend significant money on aero wheels, aero helmets, skinsuits, and integrated cockpits. The aero gains from these products are real and measurable. But there is a variable that accounts for more aerodynamic drag than all of them combined, and it costs nothing to optimize. It is you. The rider's body, position, and frontal area account for approximately 70–80% of total aerodynamic drag on a road bike at typical riding speeds. The components account for the rest.
This means that most riders who have not explicitly addressed their position have a significant performance gain available to them that requires no purchase. It also means that buying aero components before optimizing position is, aerodynamically, getting the order wrong. This guide is a structured self-audit of the variables that determine your position's aerodynamic efficiency — what you can assess yourself, what to adjust first, and where hardware eventually helps.
|
RIDER POSITION AUDIT IN 30 SECONDS
• The rider is ~70–80% of total aerodynamic drag on a road bike at 35–45 km/h — position optimization outperforms all component upgrades on this variable.
• Three free adjustments move the most: back angle, hand position on the bars, and head/shoulder behavior.
• Most position inefficiencies are visible in photos or video — a five-minute recording session on a ride reveals what a mirror does not.
• Hardware (integrated cockpit, deeper wheels) amplifies a good position; it does not fix a poor one.
|
Why Position Comes Before Product
Aerodynamic drag scales with the square of velocity. At 35 km/h, the force required to push through air is roughly four times what it is at 17.5 km/h. This is why aero improvements matter more at higher speeds — and why, at the speeds most recreational and competitive amateur riders maintain, the dominant drag source is not the bike at all. It is the frontal area the rider presents to the air.
Research from wind tunnel studies consistently puts the rider contribution to total drag in the 70–80% range in a standard road position. Independent testing has demonstrated that position changes — specifically reducing torso angle and narrowing shoulder width — can reduce rider drag by 10–20% without any hardware change. That is a larger gain than any single component purchase available at any price.
How to Conduct a Self-Audit
The most effective self-audit tool is a camera and a cooperative training partner, or a phone mount on a static object at the side of a road. Record yourself riding from the side (full body in frame) and from behind, at your typical riding effort — not posing, but actually working. What you see will tell you more about your position than a description of what you think you are doing.
Review the footage with these specific questions in mind, assessed in order of aerodynamic impact.
Checkpoint 1: Back Angle
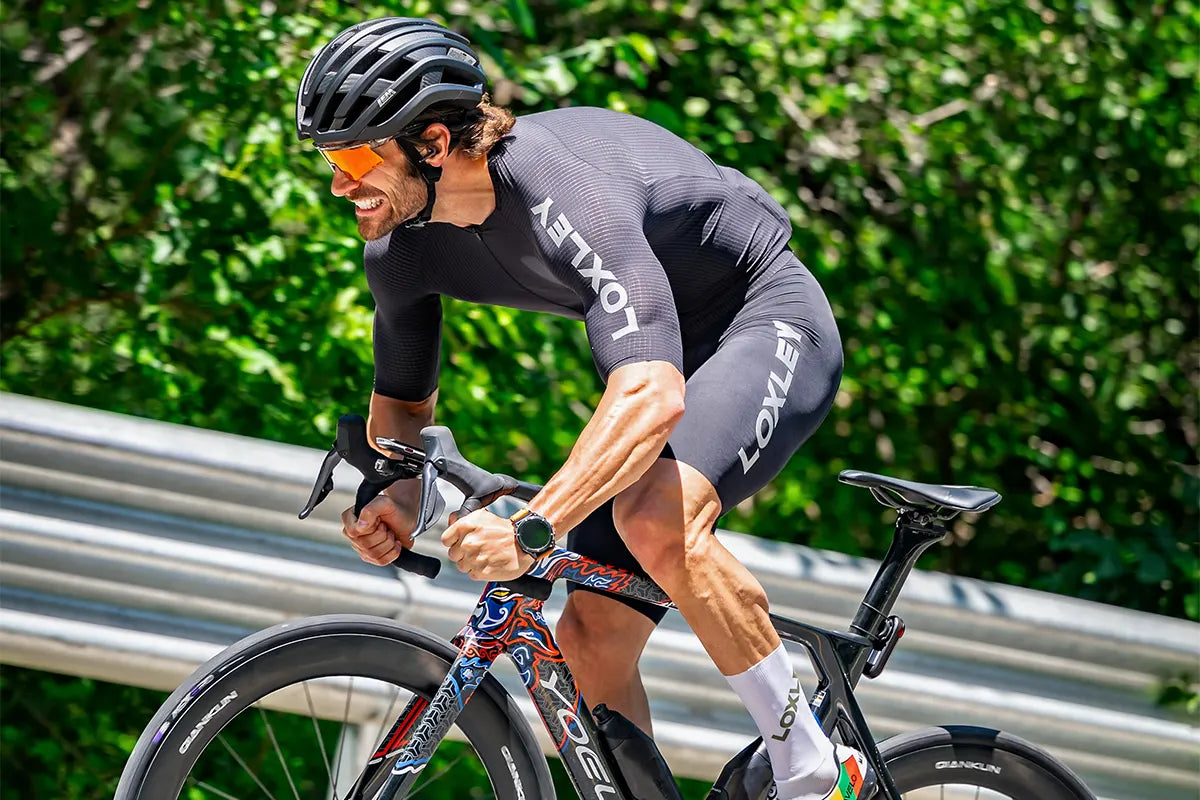
Your back angle — the angle your spine makes relative to horizontal — is the single largest controllable aero variable on your body. A flat or near-horizontal back reduces frontal area dramatically compared to an upright or curved position. In a video from the side, draw an imaginary line from your lower back to your shoulders. How far from horizontal is it?
Many riders carry their torso higher than they realize, particularly when fatigued. An upright position feels more comfortable and is more sustainable — which is exactly why it is the default. Dropping the torso by 10–15 degrees, where flexibility and comfort allow, is the first and highest-return adjustment in any position audit.

-
Target: back as flat as flexibility allows, ideally below 30 degrees from horizontal at race or hard effort pace.
-
Limitation: flexibility and hip mobility determine the floor here. Forced positions held under fatigue produce power losses that offset aero gains.
-
Adjustment: stem length and bar drop are the hardware levers, but improve flexibility first — stretching hip flexors and hamstrings unlocks position changes that no stem purchase can substitute for.
Checkpoint 2: Hand Position and Bar Width
Where your hands sit on the bar and how wide your bar is both affect frontal area and shoulder width. Historically, riders were told to go to the drops to get aero. However, modern testing shows that the "aero hoods" position—riding on the hoods with forearms completely horizontal and elbows bent at 90 degrees—is often the most aerodynamic position available, as it naturally narrows the shoulders and lowers the torso.
Compare this to a relaxed, upright hoods position where your elbows flare out and your shoulders sit high. In a from-behind video, look at your frontal profile: an active, bent-elbow position on the hoods or in the drops dramatically shrinks your silhouette.
Bar width is a variable riders often inherit rather than choose. Traditional bike fitting matched handlebar width 1:1 with your biacromial width (the distance between the bony tips of your shoulders). However, moving to a handlebar that is 2–4 cm narrower than your actual shoulder width draws your arms inward, significantly reducing your frontal area without compromising handling or chest expansion.
Checkpoint 3: Head Position
The head is a significant drag source. A head position that is raised — looking forward and up rather than looking down and forward — adds frontal area and disrupts the smooth airflow over the torso. The optimal position is a neutral neck with the chin slightly lowered, looking forward through the brow rather than by raising the chin.
This is also a comfort variable — a raised head position is more sustainable over long periods. The trade-off is real. For riders doing sportives or long endurance events, a moderate compromise (slightly raised but not fully upright) is often more practical than an extreme aero position that degrades after two hours.
Checkpoint 4: Shoulders and Elbow Position
Raised or tense shoulders increase frontal area and create turbulence over the chest. In a side-view video, look for whether your shoulders are visibly above their neutral position — a common fatigue behavior that most riders are unaware of until they see it on screen. Consciously dropping the shoulders during riding is a trainable habit; the first step is knowing when it is happening.
Elbow position affects both frontal area and comfort. Flared elbows increase width. Elbows tucked slightly inward and downward — not dramatically, just away from the wings-out position — narrow the frontal area without requiring flexibility the rider does not have.
|
Position Variable
|
What to Look for in Video
|
Free Adjustment
|
Hardware Lever (after free gains)
|
|
Back angle
|
Spine angle from horizontal — how upright is the torso?
|
Lower stem height; develop hip and hamstring flexibility
|
Shorter or lower stem; integrated cockpit at established fit
|
|
Hand position
|
Riding on hoods vs drops; arm angle
|
Practice riding in the drops at moderate effort
|
Bar width sizing on next cockpit; integrated bar/stem
|
|
Bar width
|
Shoulder width vs bar ends in rear video
|
None (hardware fixed) — audit first
|
Narrower integrated handlebar matched to shoulder width
|
|
Head position
|
Chin raised vs neutral; head height
|
Lower chin; train looking forward through brow
|
Aero helmet (after position is set — not before)
|
|
Shoulder height
|
Shoulders raised vs neutral at effort
|
Conscious shoulder drop; fatigue management
|
Lower stack; shorter headset spacers
|
|
Elbow angle
|
Flared vs tucked at effort
|
Tuck elbows inward; narrow grip width on hoods
|
Narrower bars; cockpit integration
|
What a Camera Session Reveals
Most riders who do this audit for the first time are surprised by what they see. The position they believe they are holding and the position they are actually holding at 85% effort after 90 minutes are often meaningfully different. Fatigue raises the torso. Tension raises the shoulders. Discomfort at the contact points shifts weight back. These are normal physiological responses — and they are the reasons that a position optimized on a turbo trainer at low effort may not be the position you hold outdoors in the conditions that actually matter.
The self-audit sequence: ride at your typical hard effort pace for 60–90 minutes, then have a partner film you from the side and behind for three to five minutes. Review against the checkpoints above. The positions that deviate most from the targets are your highest-return free adjustments.
Where Integrated Cockpits and Aero Wheels Come In
Once position is established — not assumed, but verified through a camera audit or professional fit — hardware upgrades amplify what is already working. An integrated cockpit at the correct fit dimensions locks in the position with cleaner cable routing, reduced frontal area at the bar, and a stem/bar combination that has been designed as a system. Yoeleo's
H9,
H21 and
H25 handlebars are T700 ProMoldCore one-piece designs: the fit dimensions are established through the audit first, then the hardware follows.

On the wheel side, once the rider is optimized, upgrading to a deeper rim profile — 50mm for all-round performance, 60mm for flat or rolling terrain — produces aerodynamic gains that stack on top of a good position rather than compensating for a poor one. The
NxT SL2 C50 and
C60 were assessed by Hambini in independent testing. The
QianKun CS50 and
CS60 provide the same wheel upgrade path in a more accessible tier, with individually replaceable carbon spokes that extend the wheelset's serviceable lifespan.

|
HOW YOELEO SUPPORTS YOUR AERO SETUP
• H9/ H21/ H25 integrated handlebars: T700 carbon, ProMoldCore one-piece construction, available in multiple bar widths and stem lengths to match your verified fit dimensions. • NxT SL2 C50 and C60: independently assessed by Hambini for aerodynamic performance; engineered to an internal 120J impact standard (3× UCI minimum); 100,000 pedaling fatigue cycles at 1,100 N. • QianKun CS50/ CS60: individually replaceable carbon spokes; star ratchet freehub; engineered to the same internal 120J standard — the accessible premium wheelset upgrade after position is set. • Full frameset geometry published (stack, reach, trail) so position decisions are supported by data at every stage of the build.
• DTC efficiency: the integrated cockpit and wheel combination that supports a verified position is available without the retail margin that typically separates it from most riders' budgets.
|
Frequently Asked Questions
How much does rider position actually affect cycling speed?
Significantly — the rider contributes approximately 70–80% of total aerodynamic drag on a road bike at 35–45 km/h. Research from wind tunnel and CFD studies consistently shows that position optimization (reducing torso angle, narrowing shoulder width) can reduce rider drag by 10–20% without any equipment change. This outperforms the gain from any single component upgrade available at any price.
Can I audit my own cycling position without a professional fit?
Yes, with a camera. Record yourself from the side and behind at a hard riding effort after 60–90 minutes of riding — not freshly warmed up on a turbo. Check back angle, shoulder height, head position, and elbow width against the checkpoints in this guide. A professional fit adds precision and accountability, but the camera audit is a high-value starting point that identifies the largest inefficiencies.
Should I buy an aero helmet before optimizing my position?
Position first. An aero helmet on a non-aero rider reduces a small fraction of the drag that could be reduced by dropping the torso and narrowing the shoulders. The sequence that maximizes return: (1) audit and improve position for free, (2) invest in a professional fit to lock in gains, (3) upgrade integrated cockpit to support the established position, (4) upgrade wheel depth, (5) consider aero helmet as a final layer of optimization.
What bar width is most aerodynamic for road cycling?
Narrower bars generally reduce frontal area, but the most aerodynamic bar width is the narrowest you can ride without compromising shoulder comfort, breathing, or bike handling. To achieve the aerodynamic benefit intended by the text, the bar should be narrower than your biacromial width, moving away from traditional bike-fitting rules that matched them 1:1.

Share:
DTC Carbon Bike Experience: 3 Frameset Build Stories
Marginal Gains Cycling: What's Worth It and What Isn't